Thứ Sáu, 12 tháng 8, 2016

Use the "Maximize throughput for file sharing" trick

Use the "Maximize throughput for file sharing" trick

As per the ServerFault Q/A titled "Intermittent connection to Windows 7 shared folder from Windows XP workstations" there's an old trick on Windows machines involving "How to Optimize Windows NT Server Using the Registry."

When you configure one of the four options for the Server service, the information is saved to the following two registry keys: HKEY_LOCAL_MACHINE\SYSTEM\CurrentControlSet\Services\lanmanserver\parameters\size Your choices for this registry key are 1,2 and 3. 1 = Minimize Memory Used 2 = Balance 3 = Maximize Throughput for File Sharing and Maximize Throughput for Network Applications HKEY_LOCAL_MACHINE\SYSTEM\CurrentControlSet\Control\Session Manager\Memory Management\LargeSystemCache

Your choices for this registry key are 0 and 1. 1 = Maximize Throughput for File Sharing 0 = Maximize Throughput for Network Applications


Thứ Sáu, 8 tháng 7, 2016

How to Uninstall Windows 10’s Built-in Apps (and How to Reinstall Them

Windows 10 includes a variety of universal apps, and there’s no easy way to hide them from the “All Apps” view in the new Start menu. You can uninstall them, but Microsoft doesn’t allow you to easily uninstall them in the usual way.

You probably don’t want to do this. These apps take up very little space on your device so it’s best to just ignore them if you don’t want to use them. But, if you really want to uninstall them, you can. If you’ve already uninstalled included apps, you can get them all back with a single command.

Uninstall the App Normally

Some apps allow you to uninstall them in the normal way. Just right-click an app in the All Apps list in the Start menu and select “Uninstall”. (On a touch screen, long-press the app instead of right-clicking.)

This trick appears to work for the included Get Office, Get Skype, Get Started, Microsoft Solitaire Collection, Money, News, Phone Companion, and Sports apps. You can also uninstall bloatware apps your PC manufacturer has installed using this trick. However, Microsoft’s other included Windows 10 apps can’t be removed in this way.

Use PowerShell to Uninstall Built-in Apps

You can uninstall most of the built-in apps — even ones that don’t normally offer an “Uninstall” option — with a PowerShell cmdlet. This trick won’t allow you to remove a few of the most important built-in apps, including Cortana and Microsoft Edge. If you try, you’ll see an error message saying they can’t be removed.

First, open PowerShell as administrator. Open the Start menu, search for “PowerShell,” right-click the PowerShell shortcut, and select “Run as administrator.” Agree to the UAC prompt.

Copy and paste one or more of the following commands into the PowerShell prompt, pressing Enter after each one to remove the apps you don’t want on your Windows 10 system:

Uninstall 3D Builder:

Get-AppxPackage *3dbuilder* | Remove-AppxPackage


Uninstall Alarms and Clock:

Get-AppxPackage *windowsalarms* | Remove-AppxPackage


Uninstall Calculator:

Get-AppxPackage *windowscalculator* | Remove-AppxPackage


Uninstall Calendar and Mail:

Get-AppxPackage *windowscommunicationsapps* | Remove-AppxPackage


Uninstall Camera:

Get-AppxPackage *windowscamera* | Remove-AppxPackage


Uninstall Contact Support:

This app can’t be removed.


Uninstall Cortana:

This app can’t be removed.


Uninstall Get Office:

Get-AppxPackage *officehub* | Remove-AppxPackage


Uninstall Get Skype:

Get-AppxPackage *skypeapp* | Remove-AppxPackage


Uninstall Get Started:

Get-AppxPackage *getstarted* | Remove-AppxPackage


Uninstall Groove Music:

Get-AppxPackage *zunemusic* | Remove-AppxPackage


Uninstall Maps:

Get-AppxPackage *windowsmaps* | Remove-AppxPackage


Uninstall Microsoft Edge:

This app can’t be removed.


Uninstall Microsoft Solitaire Collection:

Get-AppxPackage *solitairecollection* | Remove-AppxPackage


Uninstall Money:

Get-AppxPackage *bingfinance* | Remove-AppxPackage


Uninstall Movies & TV:

Get-AppxPackage *zunevideo* | Remove-AppxPackage


Uninstall News:

Get-AppxPackage *bingnews* | Remove-AppxPackage


Uninstall OneNote:

Get-AppxPackage *onenote* | Remove-AppxPackage


Uninstall People:

Get-AppxPackage *people* | Remove-AppxPackage


Uninstall Phone Companion:

Get-AppxPackage *windowsphone* | Remove-AppxPackage


Uninstall Photos:

Get-AppxPackage *photos* | Remove-AppxPackage


Uninstall Store:

Get-AppxPackage *windowsstore* | Remove-AppxPackage


Uninstall Sports:

Get-AppxPackage *bingsports* | Remove-AppxPackage


Uninstall Voice Recorder:

Get-AppxPackage *soundrecorder* | Remove-AppxPackage


Uninstall Weather:

Get-AppxPackage *bingweather* | Remove-AppxPackage


Uninstall Windows Feedback:

This app can’t be removed.


Uninstall Xbox:

Get-AppxPackage *xboxapp* | Remove-AppxPackage


How to Reinstall All Built-in Apps

If you decide you want the preinstalled apps back, you can get them back with a single line of PowerShell code. Again, open a PowerShell window as Administrator. Copy and paste the following line into the PowerShell window and press Enter:

Get-AppxPackage -AllUsers| Foreach {Add-AppxPackage -DisableDevelopmentMode -Register “$($_.InstallLocation)\AppXManifest.xml”}


This tells Windows to install those default apps again. Give it some time and allow it to finish, even if nothing appears to happen at first. Even if you see an error message, restart and examine your Start menu — you may just have all those default apps back again, anyway.

There’s no real advantage to doing this beyond decluttering your Start menu.

Thứ Ba, 14 tháng 6, 2016

Cách khắc phục lỗi thiếu biểu tượng khay hệ thống

Cách khắc phục lỗi thiếu biểu tượng khay hệ thống:

Bước 1: click vào nút Start và gõ vào “regedit” hoặc Ctrl + R và gõ vào “regedit” sau đó nhấn nút Enter.
Bước 2: Từ cửa số Windows Registry Editor vừa được mở các bạn tìm đến.
HKEY_CURRENT_USER\Software\Classes\Local Settings\Software\Microsoft\Windows\CurrentVersion\TrayNotify.
Nhấn giữ nút Ctrl chọn “IconStreams” và “PastIconsStream” sau đó nhấn nútDelete và click Yes để xóa 2 giá trị này đi. Sau khi xóa xong thì tắt cửa sổ Windows Registry Editor và làm tiếp bước 3.
Bước 3: Các bạn nhấn tổ hợp phím Ctrl + Shift + Esc để mở Task Manager lên và chọn tab Process sau đó tìm đến “explorer.exe” như hình bên dưới và click vàoEnd Process -> End Process.
Bước 4: Từ Task Manager các bạn click chọn File -> New Task(Run..) sau đó gõ vào “explorer.exe” và click OK.
- Click vào tab Users chọn User Account mà bạn đang dùng click chuột phải và chọn Log Off.
Bước 5: Đăng nhập vào lại, lúc này các System Tray Icons đã hiện thị đầy đủ cho bạn rồi đó.
Trên đây là cách để các bạn phục hồi lại các biểu tượng dưới khay hệ thống bị lỗi thiếu không hiển thị.
Lưu ý: Trên windows 7 người dùng có thể tùy chỉnh các icon được hiển thị dưới khay hệ thống, do đó mình hướng dẫn thêm tí xíu để các bạn tìm và bật các biểu tượng mà bạn cần.
- Click vào biểu tượng mũi tên màu trắng dưới thanh task bar sau đó chọn Customize…

- Click vào Turn system icons on or off để mở danh sách các biểu tượng khay hệ thống.
- Click vào menu thả xuống và chọn On/Off để bật/tắt các icon theo nhu cầu.
Chúc các bạn thành công!

One of the files containing the system's Registry data had to be recovered by use of log or alternate copy. The recovery was successful.

1. Create a new user account with administrative rights on the affected machine. Navigate to the affected user's profile directory and copy ntuser.dat to a folder named backup on your C: drive.

 (example for a user named dave: copy c:\Documents and Settings\dave\ntuser.dat to c:\backup)


 2. Once you have backed up the ntuser.dat file, overwrite it with the one located in c:\windows\repair\

 (example for a user named dave: copy c:\windows\repair\ntuser.dat to c:\Documents and Settings\dave\ )


 3. Log off the temporary account you have created and login to the affected user account and let windows fully load up. This will create a new ntuser.dat file under the user's profile.


 4. Once windows has fully loaded up, log back out of the affected user's account and log back into the temporary account you made earlier.


 5. Copy the ntuser.dat file you backed up earlier to the user's profile directory overwriting the new file that was created.

 (example for a user named dave: copy c:\backup\ntuser.dat to c:\Documents and Settings\dave\ )


 6. Log out of the temporary account and log back into the computer under the affected account and see if the problem is fixed.

Thứ Hai, 6 tháng 6, 2016

Cách xóa và Reset key bản quyền trên Windows XP

Cách xóa và Reset key bản quyền trên Windows XP:

Đối với Windows 7, Win 8 và Win 8.1, bạn tham khảo cách Reset key bản quyền trên Windows 7, 8 tại đâyMở cửa sổ "Run" bằng cách bấm tổ hợp phím "Windows+R" và phải đảm bảo bạn đang chạy dưới quyền AdministratorGõ lệnh: Regedit để mở cửa sổ công cụ Windows Registry EditorTại cây thư mục bên trái, truy nhập đến địa chỉ đường dẫn sau:HKEY_LOCAL_MACHINE\Software\Microsoft\WindowsNT\Current Version\WPAEventsTại danh sách bên phải, chuột phải vào mục "OOBETimer" chọn "Modify"Tại cửa sổ thay đổi giá trị của OOBETimer, phần "Value data", bạn hãy xóa bỏ giá trị cũ và nhập vào 1 giá trị bất kỳ nào đó (miễn sao khác với giá trị cũ) sau đó bấm "OK" để thay đổiĐóng cửa sổ công cụ Windows Registry Editor lại và khởi động lại máy để thay đổi trên có tác dụngSau khi máy tính khởi động lại, bạn sẽ thấy Windows thông báo máy của bạn chưa được đăng ký bản quyền và bạn có 30 ngày dùng thử trước khi kích hoạt bản quyền cho máy

Sau khi xóa bỏ các thông tin bản quyền cũ thành công, bạn có thể kích hoạt sử dụng key bản quyền mới theo cách sau:

Bạn mở lại cửa sổ "Run" bằng cách bấm tổ hợp phím "Windows+R"Gõ lệnh:%systemroot%\system32\oobe\msoobe.exe /a để mở cửa sổ "Activate Windows" giúp bạn kích hoạt key bản quyền mới cho WindowsTại bước đầu tiên, bạn chọn mục "Yes, I want to telephone a customer service representative to activate Windows" sau đó bấm "Next"Tiếp theo, tại cửa sổ "Activate Windows by phone" bạn bấm nút "Chage Product key" phía dưới cùngTại cửa sổ "Change preduct key" bạn nhập vào key bản quyền Windows mới gồm 25 ký tự vào và bấm nút "Update"Nếu key bản quyền chính xác, hệ thống sẽ thông báo "Windows is already activated. Click OK to exit". Xin chúc mừng, bạn đã kích hoạt thành công key bản quyền Windows mới cho máy tínhCuối cùng, bạn khởi động lại máy để hoàn tất quá trình kích hoạt bản quyền cho Windows

Ngoài ra, bạn cũng có thể thay thế và kích hoạt key bản quyền Win XP bằng cách sử phần mềm Key Update Tool tải về theo liên kết bên dưới:

Tải về KeyUpdateTool.exe từ trang chủ của MicrosoftTải về KeyUpdateTool.exe từ máy chủ dự phòng

Hướng dẫn cách xóa và Reset key bản quyền Windows cũ và đăng ký mới

MỚI

Trong nhiều trường hợp như bán máy cho người khác hoặc muốn hủy mã bản quyền trên máy này để đăng ký trên máy khác... bạn cần phải xóa bỏ mã bản quyền Windows đã được kích hoạt trên máy. Bài viết này sẽ hướng dẫn bạn thực hiện Reset lại toàn bộ thông tin bản quyền của máy tính

Hướng dẫn cách xóa và Reset key bản quyền Windows cũ và đăng ký mới

Việc xóa bỏ (Reset) thông tin bản quyền Windows (Windows Product Key) trên máy tính cũng giúp bạn có thể thay thế key bản quyền khác để kích hoạt lại quyền sử dụng cho máy, đặc biệt là khi trước đó bạn đang sử dụng key bản quyền thử nghiệm, key bản quyền lậu hoặc key không hợp pháp

Cách Reset key bản quyền trên Windows 7, Win 8 và Win 8.1:

Đối với Windows XP, bạn tham khảo cách Reset key bản quyền trên Windows XP tại đâyMở cửa sổ "Run" bằng cách bấm tổ hợp phím "Windows+R" và phải đảm bảo bạn đang chạy dưới quyền AdministratorGõ lệnh: slmgr.vbs /upk để xóa bỏ thông tin key bản quyền Windows cũ trên máy tính. Máy của bạn sẽ được Reset và xóa bỏ hoàn toàn thông tin bản quyền trước đóGõ lệnh: slmgr.vbs /cpky để xóa bỏ thông tin key bản quyền Windows cũ còn tồn tại trong Registry để đảm bảo thông tin bản quyền cũ được xóa bỏ hoàn toàn và triệt đểGõ lệnh: slmgr.vbs /rearm để thiết lập lại trạng thái bản quyền của máy khiến máy tính trở về trạng thái chưa đăng ký (Unlicensed State) và Windows sẽ yêu cầu kích hoạt bản quyền

Sau khi xóa bỏ các thông tin bản quyền cũ, bạn có thể kích hoạt sử dụng key bản quyền mới theo cách sau:

Mở cửa sổ "Run" bằng cách bấm tổ hợp phím "Windows+R" và phải đảm bảo bạn đang chạy dưới quyền AdministratorGõ lệnh: slmgr.vbs /ipk xxxxx-xxxxx-xxxxx-xxxxx-xxxxxtrong để đăng ký Key bản quyền mới cho Windows, trong đó xxxxx là mã bản quyền Windows của bạnTiếp theo, bạn gõ lệnh: slmgr /ato để kích hoạt cho Key bản quyền Windows vừa nạp ở trên, nếu Key hợp lệ, máy tính sẽ được chuyển sang trạng thái đã kích hoạt (Licensed State)Ngoài ra, bạn có thể tìm hiểu thêm các tùy chọn khác bằng cách gõ lệnh: slmgr.vbs và xem bản hướng dẫn các cú pháp

Chúc các bạn thành công!

Thứ Bảy, 4 tháng 6, 2016

Huong dan go bo driver

http://m.genk.vn/huong-dan-go-bo-hoan-toan-driver-cu-ra-khoi-he-thong-20121223102742737.chn

How To Easily Remove Old Drivers from Windows

clashes.

Normally, these old hardware drivers remain hidden as the Device Manager displays only the active devices. Using a special command, it is possible to force them into view. What is easy and neat about the whole thing is that the old devices appear grayed out – sighting and uninstalling them is just a matter of a keystroke.

So here is the short and easy method to prevent your computer from being bombed out by old driver leftovers. The process is the same for Windows XP and Vista.

Open Command prompt window in the administrator mode.From Start – All Programs – Accessories – Command Prompt – right click and Select Run as”¦ –Administrator.

Alternatively, Start – Run – Typecmd – press Ctrl+Shift +Enter to run as administrator.

Now type (or copy-paste) the following command in the window and pressEnter.

SET DEVMGR_SHOW_NONPRESENT_DEVICES=1

This forces the invisible old drivers to reveal themselves in the device manager.

Now, we have to bring up the Device Manager. Type this command in the following line and press Enter ““

devmgmt.msc

In the Device Manager, go to View – enable Show hidden devices.

The Device Manager now lists out all devices which are active and which are not. The inactive devices appear grayed out.

From the list, right click on the inactive device you wish to remove and selectUninstall to remove the driver.

In three minutes you have detected and demolished the old device drivers which were stealthily creating problems for your system. Hopefully, your system is back to its squeaky clean state. Mine certainly is.

If you liked this how-to, then you can check out this post on backing up hardware drivers too.

Thứ Hai, 30 tháng 5, 2016

Hướng dẫn kích hoạt bản quyền Windows 10 bằng máy chủ KMS

Hệ điều hành Windows 10 đã chính thức được cung cấp đến người dùng vào hôm qua, ngày 29/7, bạn có thể tải Windows 10 các phiên bản tại đây. Rất nhiều người đã, đang và sẽ nâng cấp lên Windows 10. Tuy nhiên, nếu bạn cài mới Windows 10 từ các file ISO trên thì có thể sẽ không có bản quyền.

Hướng dẫn kích hoạt bản quyền Windows 10 bằng máy chủ KMS

Không có bản quyền Windows 10 sẽ bị ảnh hưởng gì?

  1. Bạn sẽ không thể tinh chỉnh các cài đặt cá nhân trong Settings như đổi ảnh nền, đổi màu...
  2. Bị thông báo hết hạn dùng thử liên tục
  3. Sau 1 thời gian sẽ bị khóa hoàn toàn các chức năng khác

Làm sao để có bản quyền Windows 10?

  1. Mua bản quyền chính hãng từ Microsoft
  2. Nâng cấp trực tiếp từ phiên bản Windows 7, 8.1 đã có bản quyền
  3. Làm theo hướng dẫn ở cuối bài viết này
Windows 10 hiện tại không có key cho chúng ta kích hoạt bản quyền, mình cũng không dám chắc rằng Microsoft có còn mở tính năng active by phone trên Windows 10 không, 1 thời gian nữa sẽ rõ.

Hướng dẫn kích hoạt bản quyền Windows 10 qua máy chủ KMS

- Khi cài mới tức bạn sử dụng file ISO và định dạng hoàn toàn phân vùng ổ đĩa cài Windows của mình. Lúc đó mọi thứ sẽ trở về nguyên thủy ^_^
- Ở đây chúng ta sẽ lấy bản quyền qua máy chủ KMS

- Mở cmd quyền Admin lên, bằng cách đơn giản nhất là bấm phím Windows + X, bấm A (hoặc chuột phải vào Start, chọn Command Prompt (Admin))

- Sử dụng các lệnh này theo thứ tự từ trên xuống, từng lệnh rồi enter nhé:
slmgr /ipk W269N-WFGWX-YVC9B-4J6C9-T83GX
slmgr/skms kms.digiboy.ir
slmgr /ato
 Trong đó:
+ skms.ddns.net là một máy chủ KMS, trường hợp bạn sử dụng máy chủ trên bị lỗi thì thay bằng một máy chủ bên dưới này nhé (Mình sẽ cập nhật liên tục):
kms.aglc.cc
kms.didichuxing.com
xykz.f3322.org
zh.us.to
kms.digiboy.ir
3rss.vicp.net:20439
W269N-WFGWX-YVC9B-4J6C9-T83GX là key cho bản Windows 10 Pro, danh sách key tương ứng với các phiên bản ngay dưới đây:
Windows10 Professional: W269N-WFGWX-YVC9B-4J6C9-T83GX
Windows10 Professional N: MH37W-N47XK-V7XM9-C7227-GCQG9
Windows10 Enterprise: NPPR9-FWDCX-D2C8J-H872K-2YT43
Windows10 Enterprise N: DPH2V-TTNVB-4X9Q3-TJR4H-KHJW4
Windows10 Education: N2WH4N-8QGBV-H22JP-CT43Q-MDWWJ
Windows10 Education N: W6C2-QMPVW-D7KKK-3GKT6-VCFB2
Windows10 Enterprise2015 LTSB: WNMTR-4C88C-JK8YV-HQ7T2-76DF9
Windows10 Enterprise2015 LTSB: N2F77B-TNFGY-69QQF-B8YKP-D69TJ
- Sau khi thực hiện đầy đủ 3 lệnh trên thì bạn sẽ được thông báo như thế này, tức là đã kích hoạt bản quyền Windows 10 thành công:

HƯỚNG ĐẪN CÀI WINDOW 10 ACTIVE VĨNH VIỄN CHO CÁC BẠN

OKy! để cho công việc thuận lợi thì các bạn hãy nhớ làm theo hướng dẫn của mình sau đây ,và các bạn cũng đừng thắc mắc hay độc mồm độc miệng nói này nói kia nhé, hãy làm rồi nhận xét sau ! cứ quyết định vậy đi


Trường Hợp 1: Dành cho các bạn nào Máy tính (PC, Hay laptop) tức là đang ở Window 7, Window 8 mọi phiên bản đã được Active(active key lậu cũng không sao miễn sao là Window đã active )
Bước 1:
-- dowwload công cụ cập nhật bản 32bít
-- dowwload công cụ cập nhật bản 64bit
Bước 2: các bạn mở công cụ vừa Dowload ở trên MediaCreationTool (bước 1) ứng với phiên bản window bạn đang dùng
Đây là hình ảnh win8 của mình khi đã active nhưng thời hạn dùng chỉ dc 6 tháng

[​IMG]

Tiếp theo công cụ MediaCreationTool sẽ làm việc như ảnh sau :
Tại hộp thoại hiện ra, bạn chọn “Upgrade this PC now”, rồi nhấn “Next” để tiếp tục.

[​IMG]
[​IMG]

Sau khi quá trình download bản cài đặt Windows 10 kết thúc, tiếp tục nhấn “Next” ở các bước tiếp theo, rồi nhấn “Accept” để đồng ý với điều khoản sử dụng của Windows 10.


[​IMG]

--Tiếp tục nhấn “Next” ở các bước sau, khi xuất hiện hộp thoại như hình minh họa dưới đây, bạn chọn “Nothing” để xóa dữ liệu và các ứng dụng, phần mềm đã cài đặt trên Windows cũ sau khi đã nâng cấp lên Windows 10. Nhấn “Next” để tiếp tục.:

[​IMG]

[​IMG]

[​IMG]

[​IMG]

Và trong quá trình cài đặt window

[​IMG]

[​IMG]

-- Thiết lập cài đặt cho Window
[​IMG]
Đến hồi kết
[​IMG]

[​IMG]

Như vậy, bạn đã hoàn tất các bước nâng cấp Windows 10 từ Windows 7/8.1 thông qua công cụ Media Creation Tool do Microsoft cung cấp.
Đã cài đặt thành công , các bạn kết nối internet nhé

[​IMG]

sau khi kết nối ineternet thì các bạn sẽ thấy kết qua thế này [​IMG]

máy sẽ tự active cho bạn, bây giờ bạn thử kiểm tra xem máy có active vĩnh viễn hay là chỉ dùng được 6 tháng thôi thì làm như sau
--Mở cmd quyền Admin lên, bằng cách đơn giản nhất là bấm phím Windows + X, bấm A (hoặc chuột phải vào Start, chọn Command Prompt (Admin))
-->Trong hộp thoại bật lên mới, nhập "slmgr/xpr".
khi bảng thông báo hiện ra như hình dưới , thì có nghĩa là máy tính của bạn đã được active vĩnh viễn rồi
xem thêm cách xác nhận hệ thống Winddow được kích hoạt thành công hay chưa tại đây
[​IMG]

Tường Hợp 2: Là những máy đã và đang sử dụng window 10 muốn active vĩnh viễn thì các bạn làm như sau:
+ Bước 1 cài lại win 7 hoặc Win 8 bản 32bit, hay 64 bit tùy thích
có thể ddowwload tại đây
window 7 32 bit
window 7 64 bit
Bước 2: sau khi cài lại Win7, 8 rồi các bạn làm lại theo Trường Hợp 1 bên trên

Trường Hợp 3:
+ Cách làm trên của mình có thể cài đi cài lại các phiên bản Window10 mà vẫn tự active mà không cần dùng phần mềm
+ có thể cài bất kỳ file .ISO mới vẫn tự nhận active(với điều kiện là làm theo Trường hợp 1 phía trên)
+các bạn có thể kích hoạt bằng key này thử xem nhé:
Windows 10 Professional
VK7JG-NPHTM-C97JM-9MPGT-3V66T
QJNXR-YD97Q-K7WH4-RYWQ8-6MT6Y
P/sĐôi lời cùng các bạn -- để làm cái này mình mình đã thử trên dưới 10 máy tính pc, laptop các dòng máy khác nhau nên đảm bảo thành công nên mình mới , hướng dẫn cho bạn nào chưa biết, muốn dùng win 8, win10 active vĩnh viễn mà không lo sợ về bản quyền thì các bạn làm theo cách của mình, cam đoan với các bạn là thành công 100%
+ Đơn giản phải không nào. Ngay bây giờ các bạn làm theo mình đi.. và hãy cho cảm nhân, nếu có vấn đề thắc mắc xin cứ commen trong toppic để mọi người cùng giúp đỡ nhau cùng dùng chung Window10 bản quyền vĩnh viễn nhé..

Thứ Bảy, 14 tháng 5, 2016

Installing fresh Windows 7 on mirrored volume

nstalling fresh Windows 7 on mirrored volume

 Posted by Josip Medved Windows Add comments

May252011


I am fan of software mirroring in Windows 7. Yes, I know, hardware RAID is better, faster, more reliable etc. However, it has one big disadvantage. It is notoriously difficult beast to find. All those RAID controllers integrated on motherboards are usually just software RAID with some hardware support. And their drivers are notoriously bad.

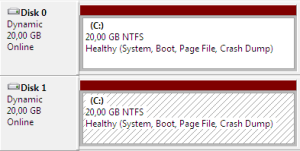
Usually we first install Windows 7 on standard MBR partition. Only after setup is done we can convert disk to dynamic one. After that mirror can be added. Well there is a little bit better way of doing things.

First you need to go into dark dungeons of command line interface. Just boot Windows setup as usually and press Shift+F10 on first screen. This will just open command prompt in which you just write “DISKPART”. That utility will be your host for the day.

Now you need to create some dynamic disks. CLEAN command is there to ensure that you start with blank drives and same procedure needs to be done for both disks. If you are not certain which disks are in computer, you might want to execute “LIST DISK” first – just to get numbers right:

> SELECT DISK 0 Disk 0 is now the selected disk. > CLEAN DiskPart succeeded in cleaning the disk. > CONVERT DYNAMIC DiskPart successfully converted the selected disk to dynamic format. > SELECT DISK 1 Disk 1 is now the selected disk. > CLEAN DiskPart succeeded in cleaning the disk. > CONVERT DYNAMIC DiskPart successfully converted the selected disk to dynamic format.

After this you’ve got two dynamic drives that need to go into some form of RAID. I opted here for RAID 1 (mirroring) but you could also select RAID 0, RAID 5 and a simple volume:

> CREATE VOLUME MIRROR DISK=0,1 DiskPart successfully created the volume.

Volume isn’t worth anything without it being formatted. Next step is just that. Do notice that I call this volume by number 1. On my system volume 0 is CD-ROM and newly created volume got next number. If your system has additional disks (or preexisting volumes), you can check which volume you need with “LIST VOLUME” command:

> SELECT VOLUME 1 Volume 1 is the selected volume. > FORMAT QUICK 100 percent completed DiskPart successfully formatted the volume.

In order to boot from this volume you need to give it a partition:

> RETAIN The selected volume now has a partition associated with it.

Of course, given partition needs to be activated. Here you will start counting from number 2 since partition 1 is reserved for “system stuff”. If you are not sure, quick check with “LIST PARTITION” is recommended:

> SELECT DISK 1 Disk 0 is now the selected disk. > SELECT PARTITION 2 Partition 2 is now the selected partition. > ACTIVE DiskPart marked the current partition as active. > SELECT DISK 0 Disk 0 is now the selected disk. > SELECT PARTITION 2 Partition 2 is now the selected partition. > ACTIVE DiskPart marked the current partition as active.

With this done you can type exit twice (once to exit DISKPART and once to exit command prompt) and do installation as you normally would. Only other thing worth mentioning might be slight confusion regarding two separate drives where you can install Windows. Everything will work no matter which disk you select there.

And this was all. As soon as installation is done your mirror will be ready.

P.S. Although I talk about Windows 7 whole post, same procedure will also work on Windows Server 2008 R2. It might even work on earlier Windows versions – I haven’t tried it.

Thứ Ba, 10 tháng 5, 2016

DrayTek Vigor Cộng băng thông nhiều đường truyền – Cùng hoặc khác nhà mạng Speedtest, download file,...đều cộng băng thông được

Nếu bạn có 2 line internet
Line 1: 30Mbps
Line 2: 50Mbps

==> Khi sử dụng DrayTek Vigor cộng băng thông thì bạn có thể speedtest hoặc download file lên đến 80Mbps(30+50)


__________________________

Link download firmware beta / RC thử nghiệm

V2912 seires: Firmware Beta r54535
Tải về http://forum.anphat.vn/download/Vigor2912_beta.zip ~ 40PC (2 wan cộng băng thông ~ max 100Mbps)

V2920 seires : Firmware CHÍNH THỨC version 3.6.8.4
Tải về http://www.anphat.vn/download/Vigor2920.zip ~ 60PC (2 wan cộng băng thông ~ max 80Mbps)

V2925 seires: Firmware 3.8.2.3_RC2a
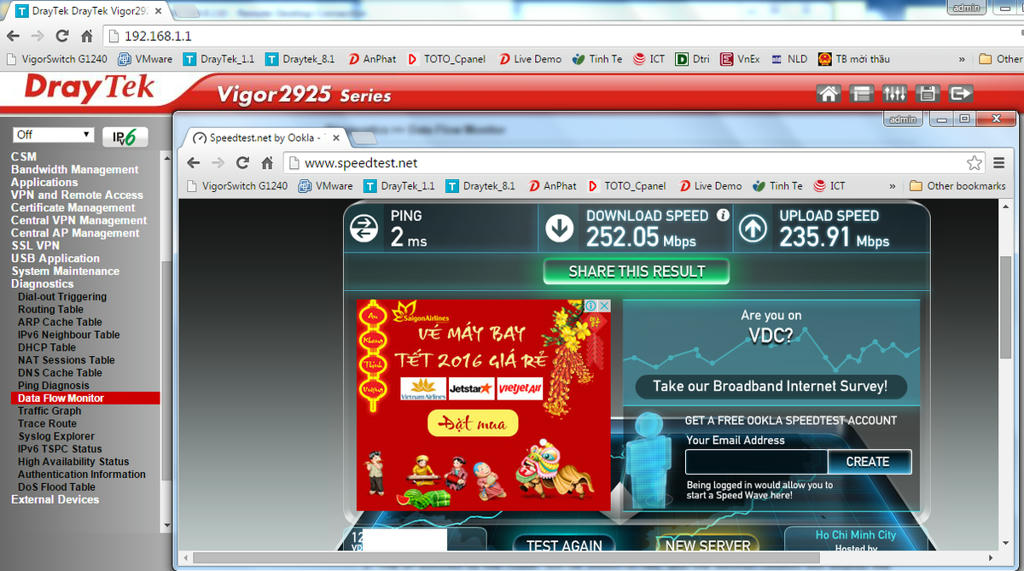
Tải về http://www.anphat.vn/download/Vigor2925.zip ~ 80PC (2 wan cộng băng thông ~ max 250Mbps)

V3200: Firmware CHÍNH THỨC version 3.6.8.2
Tải về http://www.anphat.vn/download/Vigor3200.zip ~ 100PC (4 wan cộng băng thông ~ max 90Mbps)

V300B: Firmware Beta 1.0.3 r5752
+ Hỗ trợ cộng băng thông nhiều đường truyền
+ Hỗ trợ chuyển gateway và định tuyến linh hoạt theo từng WAN / LINE == > http://forum.anphat.vn/showthread.php?t=82472
+ Hỗ trợ định tuyến theo độ trể (ping delay) == > http://forum.anphat.vn/showthread.php?t=82723
+ Hỗ trợ định tuyến theo hướng truy cập Trong Nước / Quốc Tế
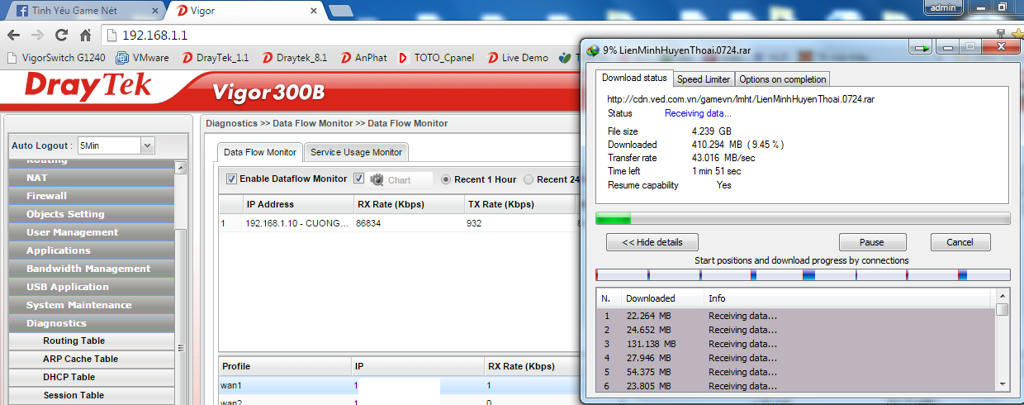
Tải về http://forum.anphat.vn/download/Vigor300B_beta.zip ~ 150PC (4 wan cộng băng thông ~ 500Mbps)

V2960: Firmware Beta 1.0.3 r5896
+ Hỗ trợ cộng băng thông nhiều đường truyền
+ Hỗ trợ chuyển gateway và định tuyến linh hoạt theo từng WAN / LINE == > http://forum.anphat.vn/showthread.php?t=82428
+ Hỗ trợ định tuyến theo độ trể (ping delay) == > http://forum.anphat.vn/showthread.php?t=82723
+ Hỗ trợ định tuyến theo hướng truy cập Trong Nước / Quốc Tế
Tải về http://forum.anphat.vn/download/Vigor2960_beta.zip ~ 150PC (2 wan cộng băng thông ~ 500Mbps)

V3900: Firmware Beta 1.0.3 r5896
+ Hỗ trợ cộng băng thông nhiều đường truyền
+ Hỗ trợ chuyển gateway và định tuyến linh hoạt theo từng WAN / LINE
+ Hỗ trợ định tuyến theo độ trể (ping delay) == > http://forum.anphat.vn/showthread.php?t=82723
+ Hỗ trợ định tuyến theo hướng truy cập Trong Nước / Quốc Tế
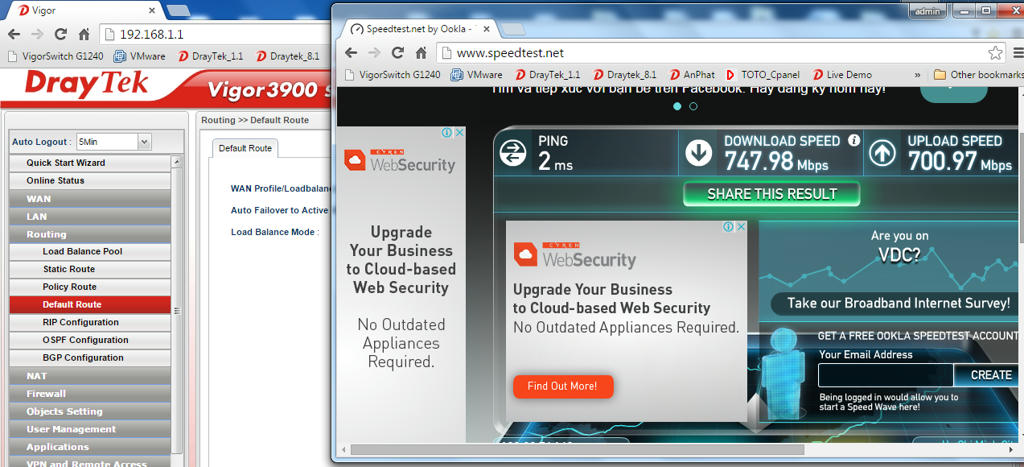
Tải về http://forum.anphat.vn/download/Vigor3900_beta.zip ~ 300PC (5~50 wan cộng băng thông ~ 1Gbps)
__________________________

Hướng dẫn cấu hình

Vigor2912 / Vigor2920 / Vigor2925 / Vigor3200 ===> Nhấn vào đây http://forum.anphat.vn/showthread.ph...007#post118007

Vigor300B / Vigor2960 / Vigor3900 ===> Nhấn vào đây http://forum.anphat.vn/showthread.ph...d=1#post118008

__________________________
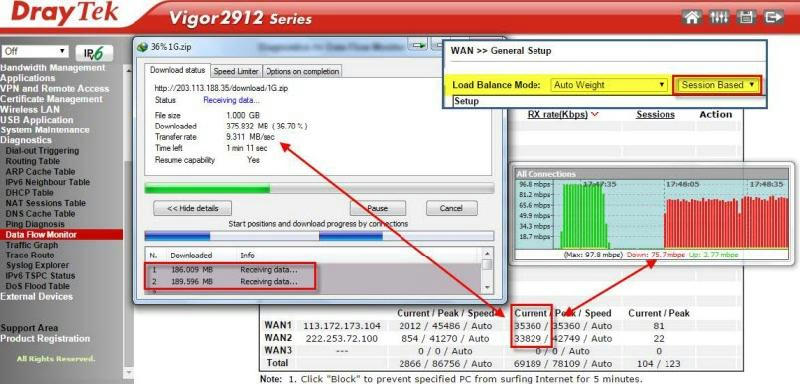
DrayTek tối ưu chức năng Load Balance cho nhiều đường truyền theo 2 phương pháp: IP Based vs Session Based. Hai phương pháp này đềucho phép cộng gộp băng thông nhiều line internet nhưng theo cách khác nhau:

1. IP Based: Cần có nhiều máy tính sử dụng cùng lúc để có thể cộng gộp băng thông nhiều line internet
- Nhiều máy tính truy cập 1 server (Khác Source IP)
- 1 máy tính truy cập nhiều server (Khác Destination IP)
- Download torrent….

2. Session Based: Chỉ cần một máy tính sử dụng / tạo nhiều session (Download IDM / Speedtest /...)
- Download file lớn với IDM
- Mở 2 tab youtube coi 2 film cùng lúc
- Test speedtest sẽ cho kết quả tốc độ là các Wan cộng lại
- Tận dụng tốt nhiều đường truyền tốc độ thấp (như ADSL, 3G) để download file dung lượng lớn
- ….

NÂNG CẤP FIRMWARE DRAYTEK CẦN LƯU Ý
[1] Download sẳn các file sau:
+ Phiên bản firmware hiện tại: ftp://ftp.draytek.com
+ Phiên bản firmware mới nhất: http://www.anphat.vn/download.aspx
+ Tool dùng để nâng cấp và phục hồi khi bị lỗi: http://www.anphat.vn/download/FirmwareUpgradeTool.zip
+ Hướng dẫn nâng cấp và phục hồi: http://nangcap.anphat.vn
[2] Backup cấu hình hiện tại (Thường nằm trong Menu System Maintenance >> Configuration Backup)
[3] Thực hiện nâng cấp firmware bằng cáp mạng (Tuyệt đối không nâng cấp firmware qua wireless)
[4] Quá trình nâng cấp firmware mất từ 1 phút đến 5 phút và sẽ gián đoạn kết nối internet
[5] Đôi khi sẽ bị mất hết cấu hìnhvà phải cấu hình lại hoặc restore file cấu hình đã backup trước đó
[6] Nếu bị lỗi trong quá trình nâng cấp, phải gửi thiết bị đến An Phát để khắc phục (miễn phí)

================//================

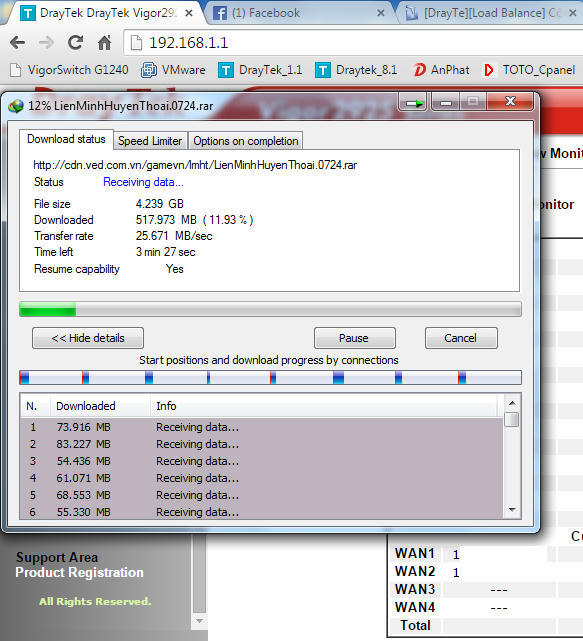
Vigor3900 chạy 4 đường truyền, 4 x 150Mbps
This image has been resized. Click this bar to view the full image. The original image is sized 1024x466.


Vigor300B chạy 4 đường truyền, 2 x 75Mbps và 2 x 95Mbps 

This image has been resized. Click this bar to view the full image. The original image is sized 1024x404.


Vigor2925 chạy 2 đường truyền, 150Mbps + 100Mbps 

This image has been resized. Click this bar to view the full image. The original image is sized 1024x570.


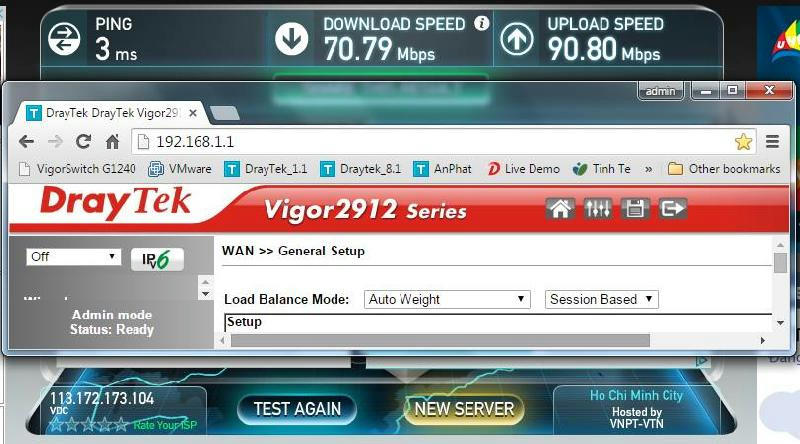
Vigor2912 chạy 2 đường truyền, mỗi đường 35Mbps

This image has been resized. Click this bar to view the full image. The original image is sized 800x444.

This image has been resized. Click this bar to view the full image. The original image is sized 800x384.


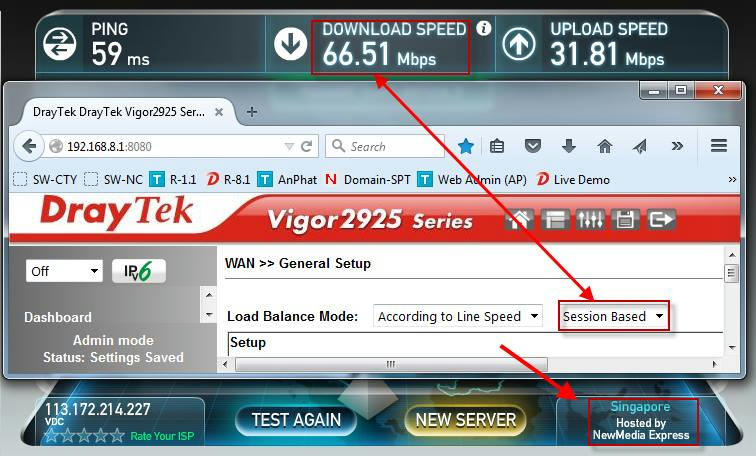
Vigor2925 chạy 2 đường truyền, mỗi đường 30Mbps

This image has been resized. Click this bar to view the full image. The original image is sized 756x456.


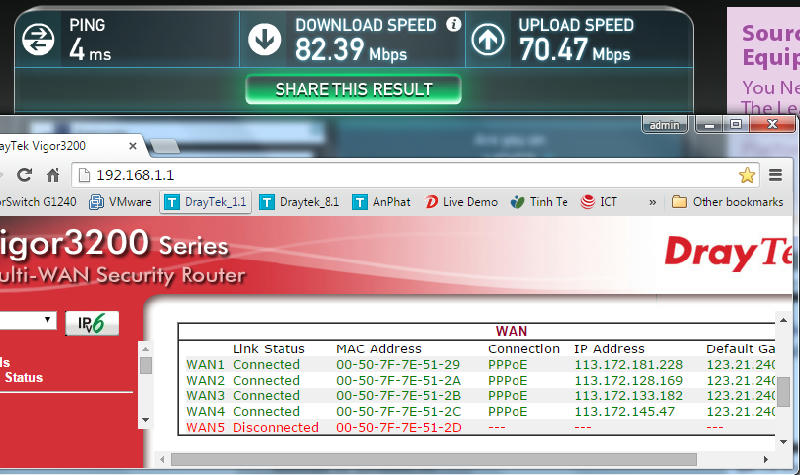
Vigor3200 chạy 4 đường truyền, mỗi đường 20Mbps

This image has been resized. Click this bar to view the full image. The original image is sized 800x475.


================//================

=====// Vigor2912 - Vigor2920 - Vigor2925 - Vigor3200 //=====

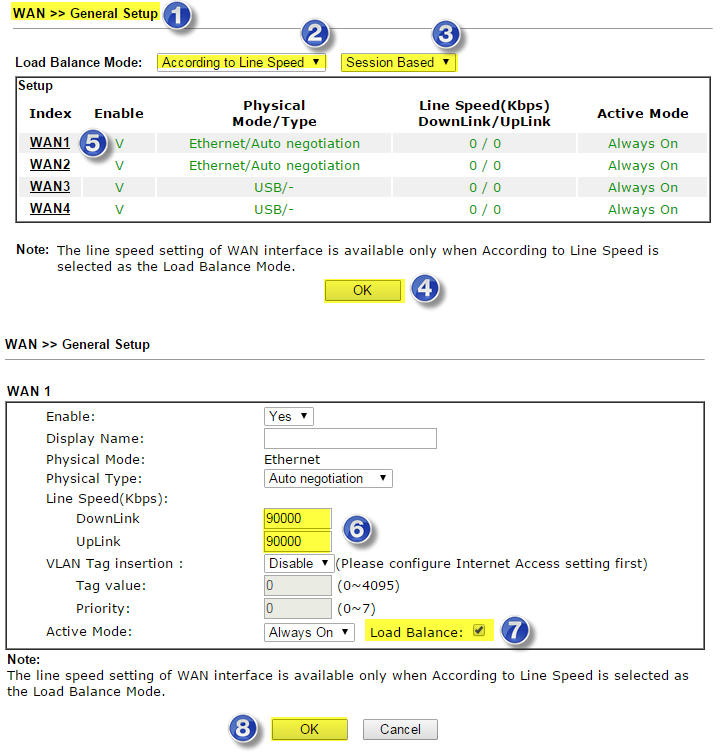
[1] Vào WAN >> General Setup
[2] Load Balance Mode: Chọn According to Line Speed
[3] Load Balance Mode: Chọn Session Based
[4] Nhấn OK
[5] Nhấn vào WAN1
[6] Điền thông số cho tốc độ đường truyền (UP/Down) ==> Điền chính xác tốc độ gói cước bạn thuê. Ví dụ, thuê đường truyền 90Mbps thì điền vào 90 x 1000 = 90000
Kbps
[7] Active mode: Chọn Load Balance
[8] Nhấn OK
[9] Thực hiện lại từ bước 5 đến bước 8 cho WAN2

This image has been resized. Click this bar to view the full image. The original image is sized 723x755.


=====// Vigor300B - Vigor2960 //=====

1. Bạn cần cấu hình cho các cổng WAN có internet và Load Balancing bình thường trước theo hướng dẫn này:http://www.anphat.vn/documentdetails.aspx?

id=192


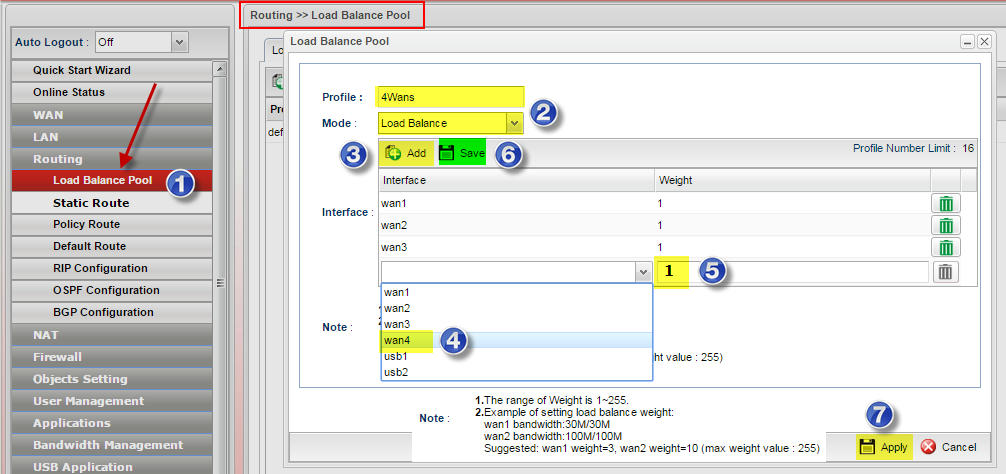
2. Tạo lại một profile bao gồm tất cả các WAN (Nếu trước đó chưa tạo)
[1] Vào Routing >> Load Balancing Pool
[2] Đặt tên cho Profile và chọn Mode là Load Balance
[3] Nhấn Add để thêm WAN vào profile
[4] Lần lượt chọn WAN cần thêm
[5] Định nghĩa tỉ lệ cho WAN
- Cách dễ nhất khỏi phải tính toán nhiều là: Lấy tốc độ WAN chia cho 10 rồi làm tròn ==> điền vào
- Ví dụ 35Mbps ==> 4 / 80Mbps ==> 8
(Lập lại từ bước 3 đến 5 để thêm vào tất cả các WAN mong muốn)

[6] Nhấn Save
[7] Nhấn Apply

This image has been resized. Click this bar to view the full image. The original image is sized 1006x474.


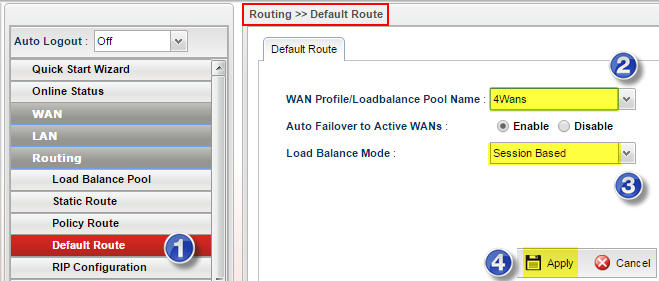
3. Chuyển sang chế độ Cộng băng thông (Sessions Based)

[1] Vào Routing >> Default Route
[2] Chọn đúng profile vừa tạo
[3] Chọn Sessions Based (Cộng băng thông)
[4] Nhấn Apply

This image has been resized. Click this bar to view the full image. The original image is sized 659x281.


cộng băng thông cộng băng thông cộng băng thông cộng băng thông cộng băng thông
cong bang thong cong bang thong cong bang thong cong bang thong cong bang thong
gộp băng thông
gop bang thông
cộng gộp băng thông nhiều line internet
__________________
Một trong những Router ISP cho khách hàng mượn khi đăng ký FTTH
TOTOLINK F1 - F2 - N300RTVNPT
TOTOLINK F1 - N151RTViettel | TOTOLINK N300RBCMC
__________________
CTY TNHH KT TH VT AN PHÁT
Nhà Phân Phối Thiết Bị Mạng DrayTek Tại VIỆT NAM

ĐC: 3C, Trần Phú, P.4, Q.5 TP.HCM
Điện thoại: (08) 39253789-Fax: (08) 39256597
Kỹ thuật : support@anphat.vn
Kinh doanh : sales@anphat.vn
Nick YM : anphat09

Chủ Nhật, 8 tháng 5, 2016

Cách giảm dung lượng file dữ liệu Outlook (.PST và .OST)

Sau một thời gian dài sử dụng, hộp thư trong Outlook của bạn sẽ "đầy lên" một cách đáng kể. Do đó mỗi khi bạn mở Outlook, quá trình mở sẽ diễn ra rất chậm, hay gặp nhiều lỗi, thậm chí là Outlook còn bị treo.

Có cách nào để giảm dung lượng các file dữ liệu trong Outlook? Mời các bạn cùng tham khảo bài viết dưới đây của Quản trị mạng.

1. Quản lý hộp thư của bạn

Mailbox Cleanup là một trong những công cụ hữu ích được sử dụng để xem dung lượng hộp thư và các thư mục cá nhân của bạn trên Outlook.

Ngoài ra bạn có thể lưu trữ các thư cũ vào Outlook Data File (.pst) để làm trống thư mục Deleted Items.

1. Click vào thẻ File.

2. Click chọn Cleanup Tools.

3. Click chọn Mailbox Cleanup.

4. Thực hiện theo các bước dưới đây:

- Để xem tổng dung lượng hộp thư và bất kỳ một thư mục nào đó, bạn click chọn View Mailbox Size.

- Để tìm các thư cũ, bạn chọn Find items older than n days, nhập một số bất kỳ trong khoảng từ 1 đến 999, sau đó click chọn Find.

- Để tìm các thư có dung lượng lớn, bạn chọn Find items larger than n kilobytes, nhập một số bất kỳ trong khoảng từ 1 đến 9999, sau đó click chọn Find.

- Để xóa các thư cũ trong hộp thư của bạn để lưu trữ vào Outlook Data File (.pst), click chọn AutoArchive.

Outlook Data Files (.pst) được lưu trong thư mục Documents\Outlook Files trên máy tính của bạn. Nếu sử dụng Windows XP, file .pst được lưu trong thư mục My Documents\Outlook Files.

- Để xem dung lượng của thư mục Deleted Items, bạn click chọn View Deleted Items Size.

- Để "làm trống" thư mục Deleted Items, bạn click chọn Empty.

- Để xem dung lượng thư mục Conflicts, click chọn View Conflicts Size.

- Để xóa các nội dung trong thư mục Conflicts, click chọn Delete.

2. Giảm dung lượng Outlook Data File (.pst)

Nếu bạn xóa các mục trong Outlook Data File (.pst), các file sẽ tự động được nén trên nền background khi Outlook đang chạy nhưng bạn không sử dụng máy tính.

Ngoài ra bạn có thể nén các mục này bằng tay. Quá trình nén Outlook Data File (.pst) sẽ mất khoảng vài phút.

1. Xóa bất kỳ mục nào mà bạn không muốn lưu trữ.

2. Mở Folder List view.

Ở góc dưới cùng Navigation Pane bạn click chọn biểu tượng Folder List hoặc nhấn tổ hợp phím Ctrl + 6.

3. Trên giao diện Navigation Pane, bạn kích chuột phải vào thư mụcDeleted Items, rồi click chọn Empty Folder.

4. Click chọn thẻ File.

5. Click chọn Account Settings, sau đó click chọn Account Settings.

6. Trên thẻ Data Files, click chọn file dữ liệu mà bạn muốn nên, sau đó click chọn Settings.

7. Click chọn Compact Now.

Lưu ý:

Bạn không cần thoát Outlook sau khi nén file Outlook Data File (.pst).

3. Giảm dung lượng Outlook Data File Offline (.ost)

Giảm dung lượng một file .OST giúp cải thiện hiệu suất Outlook đáng kể. Quá trình này không xóa bất kỳ một thư, mục nào được lưu đang chạy Microsoft Exchange Server trên máy tính của bạn.

1. Xóa bất kỳ một thư, mục nào mà bạn không muốn lưu trữ.

2. Mở Folder List view.

Ở góc dưới cùng Navigation Pane bạn click chọn biểu tượng Folder List hoặc nhấn tổ hợp phím Ctrl + 6.

3. Trên giao diện Navigation Pane, bạn kích chuột phải vào thư mụcDeleted Items, rồi click chọn Empty Folder.

4. Click chọn thẻ File.

5. Click chọn Account Settings, sau đó click chọn Account Settings.

6. Trên thẻ Data Files, click chọn file dữ liệu mà bạn muốn nén, sau đó click chọn Settings.

7. Click chọn Compact Now.

Lưu ý:

- Để xóa các mục từ thư mục online và offline, bạn chọn các mục sau đó chọn Delete.

- Nếu đang sử dụng tài khoản Exchange ở chế độ Cached Exchange Mode, bạn chỉ lựa chọn xóa các mục trong thư mục offline Outlook Data File (.ost).

- Theo mặc định, khi bạn sử dụng chế độ Cached Exchange Mode, các thư mục public mà bạn yêu thích sẽ không được đồng bộ.

Nếu bạn chọn đồng bộ các thư mục public, dung lượng .OST sẽ tăng lên đáng kể.

Chủ Nhật, 24 tháng 4, 2016

Fix lỗi svchost.exe chiếm bộ nhớ ram: win8/7/

Fix lỗi  svchost.exe chiếm bộ nhớ ram: win8/7/
  1. Tắt dịch vụ windows update.
  2. Hkey_local-Machine\software\microsoft\Ole sửa giá trị Y thành N trong từ khóa Enable DCOM
  3. Hkey_local-Machine\system\currentControlset\service\NetBT\Parameters\ xóa giá trị trong từ khóa TransportBindName.
reboot

Thứ Ba, 5 tháng 4, 2016

How to Use RTSP Stream

How to Use RTSP Stream© 2013 cctvdiscover.com. All rights reserved.
Last Updte: 2014-1-3


What is RTSP stream?
The Real Time Streaming Protocol (RTSP) is a network control protocol designed for use in entertainment and communications systems to control streaming media servers. The protocol is used for establishing and controlling media sessions between end points.
RTSP is a standard video & audio output stream from network camera, use the RTSP stream you can easy install network camera to the third-party surveillance progeams. Or use VLC & QuickTime player to test real time video screen.
Usually IP products use 554 to be a default rtsp port.

Which products has RTSP stream?
NVS Series
NVS-9248
NVS-900H
NVS-900L
NVS-800
NVS-1011
NVS-720M
NVS-2020
NVS-2010
IPC Series
IPC-6001
IPC-88
IPC-9605
IPC-3120
IPC-3121
MP131 Series
MP-13101
MP-13102
MP-13103
MP-13104
MP-9604IR
IPCH
IPHC-2P
IPK2-2P
Korea IPC
IPC-601
IPC-9004D1
5 Series DVR
D5004T
D5004V
D5008T


NVS Series
DM355 MPEG-4 D1 Resolution
(for NVS-9248 and early 2011 NVS products)
URL format:

rtsp://{admin:admin}@[ip-address]:554/0 - Channel-1(D1)
rtsp://{admin:admin}@[ip-address]:554/1 - Channel-2(CIF)
rtsp://{admin:admin}@[ip-address]:554/2 - Channel-3(QCIF)
Sample:

rtsp://192.168.1.217/0 (short path)

rtsp://admin:admin@192.168.1.217:554/0 (full path)

DM365 H.264 D1 Resolution
(for ptz network camera and video server)
URL format:

rtsp://{admin:admin}@[ip-address]:554/1/d1 - Channel-1(D1)
rtsp://{admin:admin}@[ip-address]:554/2/cif - Channel-2(CIF)
Sample:

rtsp://192.168.1.217/1/d1 (short path)

rtsp://admin:admin@192.168.1.217:554/1/d1 (full path)


IPC Series
IPC Network Product & 5 Series Network DVR
URL format:

rtsp://[ip-address]:554/user=admin&password=&channel=1&stream=0.sdp?
[channel=1]
Network camera and video server only have 1 channel video stream, please ignore this parameter.
[stream=0]
Stream=0 [main stream]
Stream=1 [sub stream]

Sample:

rtsp://192.168.1.10:554/user=admin&password=&channel=1&stream=0.sdp?


MP131 Series
MP131 H.264 Video Stream
URL format:
rtsp://admin:admin@192.168.1.128:554/ch1-s1
admin:admin [username and password]
192.168.1.128 [IP address]
554 [RTSP port]
ch1-s1 [channel-1 and stream-1]
All the products are only have channel 1.
s1 - main stream
s2 - sub stream
If enable the Anonmous mode, rstp url can ignore username and password.


IPHC Series
H.264/MPEG4 Video Stream Path
URL format:
rtsp://admin:123456@192.168.1.123:554/mpeg4
admin:123456 [username and password]
192.168.1.128 [IP address]
554 [RTSP port]
mpeg4 [main stream]
If enable, password is request.


Korea IPC Products
IPC-601 Video Server
IPC-9004D1 4CH DVR
Default setting the RTSP function was disable, please enable this function first.
URL format:
rtsp://admin:1234@192.168.1.99:554/stream1
admin:1234 [username and password] (selected access control)
192.168.1.99 [IP address]
554 [RTSP port]
stream1
stream1 - main stream
stream2 - sub stream


Megapixel-HD 3 Series ONVIF BETA Frimware
Note: this part only use for ONVIF frimware test, production frimware not have rtsp stream.

rtsp://192.168.1.170:554/MainStream