nstalling fresh Windows 7 on mirrored volume
Posted by Josip Medved Windows Add comments
May252011
 I am fan of software mirroring in Windows 7. Yes, I know, hardware RAID is better, faster, more reliable etc. However, it has one big disadvantage. It is notoriously difficult beast to find. All those RAID controllers integrated on motherboards are usually just software RAID with some hardware support. And their drivers are notoriously bad.
Usually we first install Windows 7 on standard MBR partition. Only after setup is done we can convert disk to dynamic one. After that mirror can be added. Well there is a little bit better way of doing things.
First you need to go into dark dungeons of command line interface. Just boot Windows setup as usually and press Shift+F10 on first screen. This will just open command prompt in which you just write “DISKPART”. That utility will be your host for the day.
Now you need to create some dynamic disks. CLEAN command is there to ensure that you start with blank drives and same procedure needs to be done for both disks. If you are not certain which disks are in computer, you might want to execute “LIST DISK” first – just to get numbers right:
> SELECT DISK 0 Disk 0 is now the selected disk. > CLEAN DiskPart succeeded in cleaning the disk. > CONVERT DYNAMIC DiskPart successfully converted the selected disk to dynamic format. > SELECT DISK 1 Disk 1 is now the selected disk. > CLEAN DiskPart succeeded in cleaning the disk. > CONVERT DYNAMIC DiskPart successfully converted the selected disk to dynamic format.
After this you’ve got two dynamic drives that need to go into some form of RAID. I opted here for RAID 1 (mirroring) but you could also select RAID 0, RAID 5 and a simple volume:
> CREATE VOLUME MIRROR DISK=0,1 DiskPart successfully created the volume.
Volume isn’t worth anything without it being formatted. Next step is just that. Do notice that I call this volume by number 1. On my system volume 0 is CD-ROM and newly created volume got next number. If your system has additional disks (or preexisting volumes), you can check which volume you need with “LIST VOLUME” command:
> SELECT VOLUME 1 Volume 1 is the selected volume. > FORMAT QUICK 100 percent completed DiskPart successfully formatted the volume.
In order to boot from this volume you need to give it a partition:
> RETAIN The selected volume now has a partition associated with it.
Of course, given partition needs to be activated. Here you will start counting from number 2 since partition 1 is reserved for “system stuff”. If you are not sure, quick check with “LIST PARTITION” is recommended:
> SELECT DISK 1 Disk 0 is now the selected disk. > SELECT PARTITION 2 Partition 2 is now the selected partition. > ACTIVE DiskPart marked the current partition as active. > SELECT DISK 0 Disk 0 is now the selected disk. > SELECT PARTITION 2 Partition 2 is now the selected partition. > ACTIVE DiskPart marked the current partition as active.
With this done you can type exit twice (once to exit DISKPART and once to exit command prompt) and do installation as you normally would. Only other thing worth mentioning might be slight confusion regarding two separate drives where you can install Windows. Everything will work no matter which disk you select there.
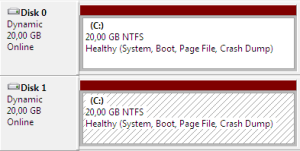
And this was all. As soon as installation is done your mirror will be ready.
P.S. Although I talk about Windows 7 whole post, same procedure will also work on Windows Server 2008 R2. It might even work on earlier Windows versions – I haven’t tried it.
Không có nhận xét nào:
Đăng nhận xét